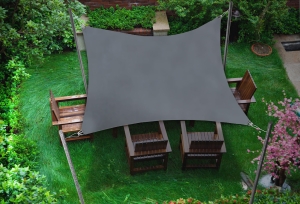
Want to make sure your shade sail looks stunning and lasts for years? The secret lies in proper tensioning.
Let's go over the professional techniques that will help you achieve that perfect, taut installation you've been dreaming of.
Why Proper Tensioning of a Shade Sail Matters
Before we get into the how-to, it's crucial to understand why a properly tensioned sail is so important.
The Benefits of Perfect Shade Sail Tension
When you tension your shade sail like a professional, you'll enjoy these key advantages:
Enhanced Stability
A tightly tensioned sail stands strong against wind, reducing the risk of damage to both the fabric and hardware. Professional installers aim to maintain significant tension on each corner for optimal stability.
Superior Water Management
Forget about those unsightly water pools in the middle of your sail. With proper tension and at least 25% angling, rainwater flows off easily, protecting your sail and the furniture beneath.
Extended Lifespan
A well-tensioned sail experiences less wear and tear, meaning your investment lasts longer. It also prevents the fabric from deteriorating due to constant movement and strain.
Professional Aesthetics
There's nothing quite like the sleek, architectural look of a perfectly tensioned shade sail. No sagging, no wrinkles – just clean, crisp lines that enhance your outdoor space.
Essential Tensioning Methods
Ready to achieve that professional finish? Let's explore the two primary methods professionals use to create the perfect tension.
The Turnbuckle Method
This professional-grade approach is both reliable and precise. Here's how to do it properly:
- Initial Setup: Start with your turnbuckles about half extended – this gives you room for adjustment in both directions. Locate the turnbuckle between two snap hooks at each corner of your sail.
- Tensioning Process: Work your way around the sail, turning each turnbuckle clockwise.
Pro tip: Use a spanner or screwdriver for extra leverage, but be careful not to overtighten. - Even Distribution: The key is to tension gradually and evenly across all corners. Don't fully tighten one corner before moving to the next – this can create uneven stress points. To avoid beginner mistakes, make sure to check out our tutorial.
The Tension Strap System
For those looking for a more flexible solution, tension straps offer excellent control. This method is particularly effective for larger installations:
Installation Steps:
- Wrap the strap around the sail's perimeter
- Feed it through the tensioning mechanism
- Pull to achieve desired tightness
- Secure the strap firmly in place
Remember: A professional installation means achieving considerable tension at each corner. While this might sound like a lot, it's essential for optimal performance.
Professional Installation Tips
The real secret to professional-grade tensioning isn't just about pulling things tight – it's about understanding the science behind a perfect installation. Here's what the pros know:
Using Wire Rope Like a Pro
Here's something many DIY installers miss – perimeter wire rope is essential, not optional. Professional installers always use wire rope through the sail's perimeter pocket because it:
- Distributes tension evenly across the entire sail
- Prevents stress concentration at attachment points
- Reduces the risk of fabric tearing at the corners
Pro tip: When installing wire rope, ensure it's properly tensioned before making final adjustments to your corner fittings. This creates a solid foundation for the entire installation.
Maintenance and Troubleshooting
Want to maintain that professional finish? Regular maintenance is key. Here's what the experts recommend:
Monthly Checks
Give those turnbuckles a quick check and adjustment every month. It's normal for tension to decrease slightly over time, but staying on top of it prevents bigger issues.
Watch for Warning Signs
If you notice any of these issues, it's time for immediate attention:
- Centre sagging
- Flapping in light winds
- Water pooling
- Wrinkles that weren't there before
Seasonal Maintenance
Apply a light coating of oil to your stainless steel fittings every couple of months to prevent wear and ensure smooth operation. This simple step can significantly extend the life of your hardware.
Ready to create your perfect outdoor space? Browse our selection of premium shade sails, with delivery in just 24-48 hours for standard products. Not sure which tensioning method would work best for your installation? Our expert team is here to help – reach out today and let us guide you toward achieving that professional-grade finish you're looking for.
FAQ
Can I install a shade sail against my house wall?
Whilst mounting to a house wall is possible, you'll need to ensure the mounting points are properly secured to structural elements like studs or brick, not just the exterior cladding. Always check your local building regulations, as some areas require specific permits for house-mounted shade sails.
How do I calculate the correct sail size for my space?
To determine the optimal sail size, you need to subtract 25cm from each dimension between mounting points. For example, for smaller sails - if the distance between mounting points is 300x300cm, the sail should be a maximum of 275x275cm. If you're planning a larger sail and the distances between mounting points are 400x400cm, the sail should be a maximum of 300x300cm.
Can I leave my shade sail up during winter?
Since shade sails are specifically designed for sun protection, it's best to take care of them after the summer season. To maximize their lifespan and maintain their appearance, make sure to wash or clean your sail, dry it thoroughly, and store it in a dry place until next season.
Total reviews: 21 reviews