Shade sails have become one of the most popular outdoor shading solutions for homeowners and businesses alike. Their elegant appearance, practical functionality, and relatively straightforward installation make them an attractive choice for patios, gardens, pool areas, and commercial spaces. However, despite their apparent simplicity, many people make critical errors when selecting, installing, and maintaining their shade sails—mistakes that can lead to disappointing results, premature wear, and unnecessary expenses.
Understanding these common pitfalls before you begin your shade sail project can save you significant frustration and money in the long run. Whether you're a first-time buyer or looking to replace an existing installation, this comprehensive guide will help you navigate the process with confidence and achieve the stunning, functional outdoor space you envision.
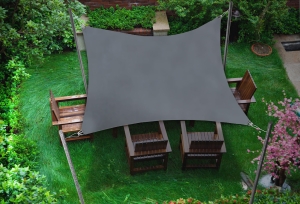
Mistake 1: Choosing the Wrong Size
One of the most frequent errors people make is selecting a shade sail that doesn't properly fit their space. This mistake typically manifests in two ways: choosing a sail that's too small, leaving gaps where the sun can penetrate, or selecting one that's too large, creating installation challenges and an overwhelming aesthetic.
Accurate measurements are absolutely essential before making any purchase. Many homeowners simply estimate their space dimensions, only to discover upon delivery that their new shade sail doesn't provide adequate coverage or doesn't fit the available mounting points.
When measuring your space, consider not just the area you want to shade, but also the sun's movement throughout the day. The sun's position changes seasonally, and what provides perfect shade in spring may leave you exposed during the hottest summer afternoons. For those who need precise coverage for unique spaces, made to measure options offer the perfect solution, ensuring your sail fits your exact requirements.
Mistake 2: Ignoring the Importance of Proper Tension
A shade sail is only as good as its tension. Insufficient tension is the leading cause of premature sail failure, yet it remains one of the most overlooked aspects of installation. A properly tensioned shade sail should be taut and wrinkle-free, creating a smooth, aesthetically pleasing surface that efficiently sheds water and resists wind.
Common signs of inadequate tension include:
- Visible sagging or pooling, especially after rain
- Flapping or excessive movement in light winds
- Wrinkles or creases across the fabric surface
- Uneven stress distribution causing fabric distortion
When a sail lacks proper tension, water accumulates in low spots, adding tremendous weight that stresses the fabric, stitching, and mounting hardware. Over time, this leads to stretched fabric, torn seams, and potentially dangerous hardware failure. Additionally, a loose sail catches wind like a parachute, creating forces that can damage both the sail and the structures to which it's attached.
Mistake 3: Underestimating Hardware Requirements
The hardware connecting your shade sail to its anchor points is just as important as the sail itself. Many DIY installers make the costly mistake of using inadequate or inappropriate hardware, compromising the entire installation's safety and longevity.
Professional-grade galvanized steel hardware is non-negotiable for any shade sail installation. Standard hardware store fixtures designed for general purposes simply cannot withstand the constant tension and dynamic forces a shade sail experiences. Wind gusts, thermal expansion and contraction, and the weight of accumulated rainwater all place tremendous stress on mounting points.
Your hardware selection should include:
- Marine-grade galvanized steel turnbuckles for tension adjustment
- Heavy-duty D-shackles or snap hooks rated for appropriate loads
- Properly sized eye bolts or pad eyes with adequate thread engagement
- Wall plates or post brackets designed specifically for shade sail applications
Cutting corners on hardware is a false economy. The cost difference between adequate and inadequate hardware is minimal compared to the expense of replacing a failed installation—or worse, dealing with injuries or property damage caused by a sail that tears loose.
Mistake 4: Selecting the Wrong Fabric Type
Not all shade sail fabrics are created equal, and choosing the wrong type for your specific needs is a mistake that becomes apparent only after installation. Understanding the difference between permeable and waterproof fabrics is crucial for making the right selection.
Standard shade sails are typically made from high-density polyethylene (HDPE) mesh fabric. These breathable sails excel at blocking UV radiation while allowing air to circulate freely, reducing heat buildup underneath. They're ideal for hot climates where ventilation is a priority and where occasional rain isn't a concern.
However, if you need protection from both sun and rain, waterproof shade sails made from PVC-coated polyester or Premium Decor are the better choice. These sails create a solid barrier against precipitation, making them perfect for outdoor dining areas, carports, or any space where you want to stay dry. The trade-off is reduced breathability, so they're best suited for well-ventilated areas or climates where heat buildup isn't a major concern.
Consider your primary needs carefully. Do you want maximum airflow? Choose mesh. Need rain protection? Go waterproof. Many homeowners benefit from having both types for different areas of their outdoor space.
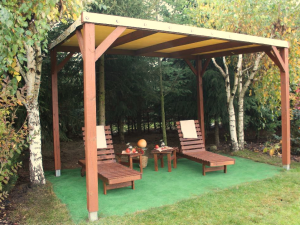
Mistake 5: Poor Mounting Point Planning
Where and how you anchor your shade sail dramatically affects its performance, appearance, and lifespan. Poor mounting point planning is a surprisingly common mistake that often requires expensive corrections.
The ideal installation angle creates a slope of at least 20-30 degrees from the highest to the lowest point. This angle serves multiple critical functions: it promotes water runoff, creates visual interest, and helps the sail maintain proper tension. A flat or nearly flat installation invites water pooling, sagging, and eventual damage.
Many homeowners also fail to consider the structural integrity of their chosen mounting points. Shade sails generate significant forces, particularly during windy conditions. Mounting to weak structures, undersized posts, or walls without proper reinforcement is a recipe for disaster. Before installation, verify that all mounting points can handle sufficient loads per attachment point.
Additionally, consider accessibility for maintenance and seasonal removal. Mounting points that are difficult to reach make routine tensioning adjustments and end-of-season removal unnecessarily complicated.
Mistake 6: Neglecting Local Weather Conditions
Your local climate should heavily influence every aspect of your shade sail selection and installation, yet many buyers treat shade sails as one-size-fits-all products. Failing to account for local weather patterns can result in an installation that's unsuitable for your environment.
For areas with high winds, you need reinforced stitching, stronger hardware, and more robust mounting points. Some locations may require permits or engineering certification for shade sail installations. Coastal regions demand hardware with superior corrosion resistance due to salt air exposure.
In regions with heavy snowfall, shade sails must be removed before winter to prevent damage from snow accumulation. Even waterproof sails aren't designed to bear the weight of snow, and attempting to use them as permanent year-round structures in snowy climates will lead to failure.
Hot, sunny climates require fabrics with high UV resistance to prevent premature degradation. While quality shade sails are designed to withstand sun exposure, extreme conditions accelerate wear, making fabric quality even more important.
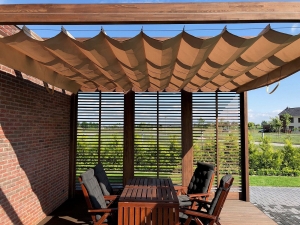
Mistake 7: Improper Installation Geometry
The geometric configuration of your shade sail affects both its appearance and function. A triangular sail requires three anchor points, a square or rectangular sail needs four, and more complex installations may use multiple sails with overlapping coverage. Getting the geometry wrong creates problems that range from aesthetic disappointments to functional failures.
One common geometric error is creating too flat an installation. Without adequate height variation between mounting points, the sail appears lifeless and fails to create the dynamic, sculptural look that makes shade sails so visually appealing. Aim for at least one metre of height difference between your highest and lowest anchor points for standard residential installations.
Another frequent mistake is positioning anchor points too close together, resulting in a cramped, ineffective shade area. Alternatively, spacing them too far apart stretches the sail beyond its design limits, creating excessive stress and reducing lifespan.
Consider these geometric principles for optimal results:
- Twist the sail slightly by alternating high and low corners for visual interest
- Ensure the lowest point is positioned where water can drain safely away
- Allow adequate clearance beneath the lowest point for comfortable use of the space
- Plan for the sail's shadow pattern at different times of day
Mistake 8: Skipping Regular Maintenance
Even the highest-quality shade sail requires regular maintenance to achieve its full lifespan potential. Neglecting routine care is perhaps the most costly long-term mistake shade sail owners make, as it transforms a durable investment into a short-lived disappointment.
Maintenance requirements aren't demanding, but they are essential. Regular cleaning prevents the buildup of dirt, debris, and organic matter that can stain fabric, promote mould growth, and degrade materials over time. Most shade sails can be cleaned with mild soap and water—avoid harsh chemicals or pressure washers that can damage the fabric or protective coatings.
Periodic tension checks are equally important. All shade sails stretch slightly over time, and seasonal temperature changes cause expansion and contraction. Check your sail's tension monthly during the active season and adjust turnbuckles as needed to maintain that taut, wrinkle-free appearance.
Inspect hardware regularly for signs of wear, corrosion, or fatigue. Replace any components that show significant deterioration before they fail catastrophically. A small investment in replacement hardware is far preferable to the cost of replacing an entire installation—or dealing with damage caused by a sail that breaks free.
Making the Right Choice
Avoiding these eight common mistakes will dramatically improve your shade sail experience. The key takeaways are straightforward: measure carefully, invest in quality materials and hardware, plan your installation geometry thoughtfully, consider your local conditions, and commit to regular maintenance.
A well-chosen, properly installed shade sail provides years of comfortable outdoor enjoyment while adding significant aesthetic value to your property. The initial investment in doing things correctly pays dividends through extended product life, reduced maintenance headaches, and the satisfaction of an installation that looks and performs exactly as intended.
Take your time during the planning phase, don't cut corners on materials, and when in doubt, consult with professionals who specialise in shade sail installations. Your outdoor space deserves a solution that combines beauty, functionality, and lasting durability—and with the right approach, that's exactly what a quality shade sail delivers.
Total reviews: 32 reviews